
Information
With the "Edit Tray" application, trays can be requested manually and the layout of the trays can then be edited. It is possible to delete existing bins as well as creating new bins. With this process, for example multiple small bins can be transformed into a new, big one. This also works the other way round, one big bin can be divided into multiple small bins.
For the creation of new bins it is important, that a suitable grid for the tray is stored in the system. Furthermore, the dimensions for the storage bin types must be maintained. Only bins that have no quant data can be deleted. This means that the bin must be empty and no open transfer orders are aiming at this bin.
Selection of the tray
The process consists of two screens: The input screen and the worklist. The input screen is divided into three areas: the navigation menu (left), the main window (center) and the navigation bar (bottom).
The navigation menu can be used to switch between the individual applications. The main window displays relevant data. The buttons that guide through the process are located in the navigation bar.
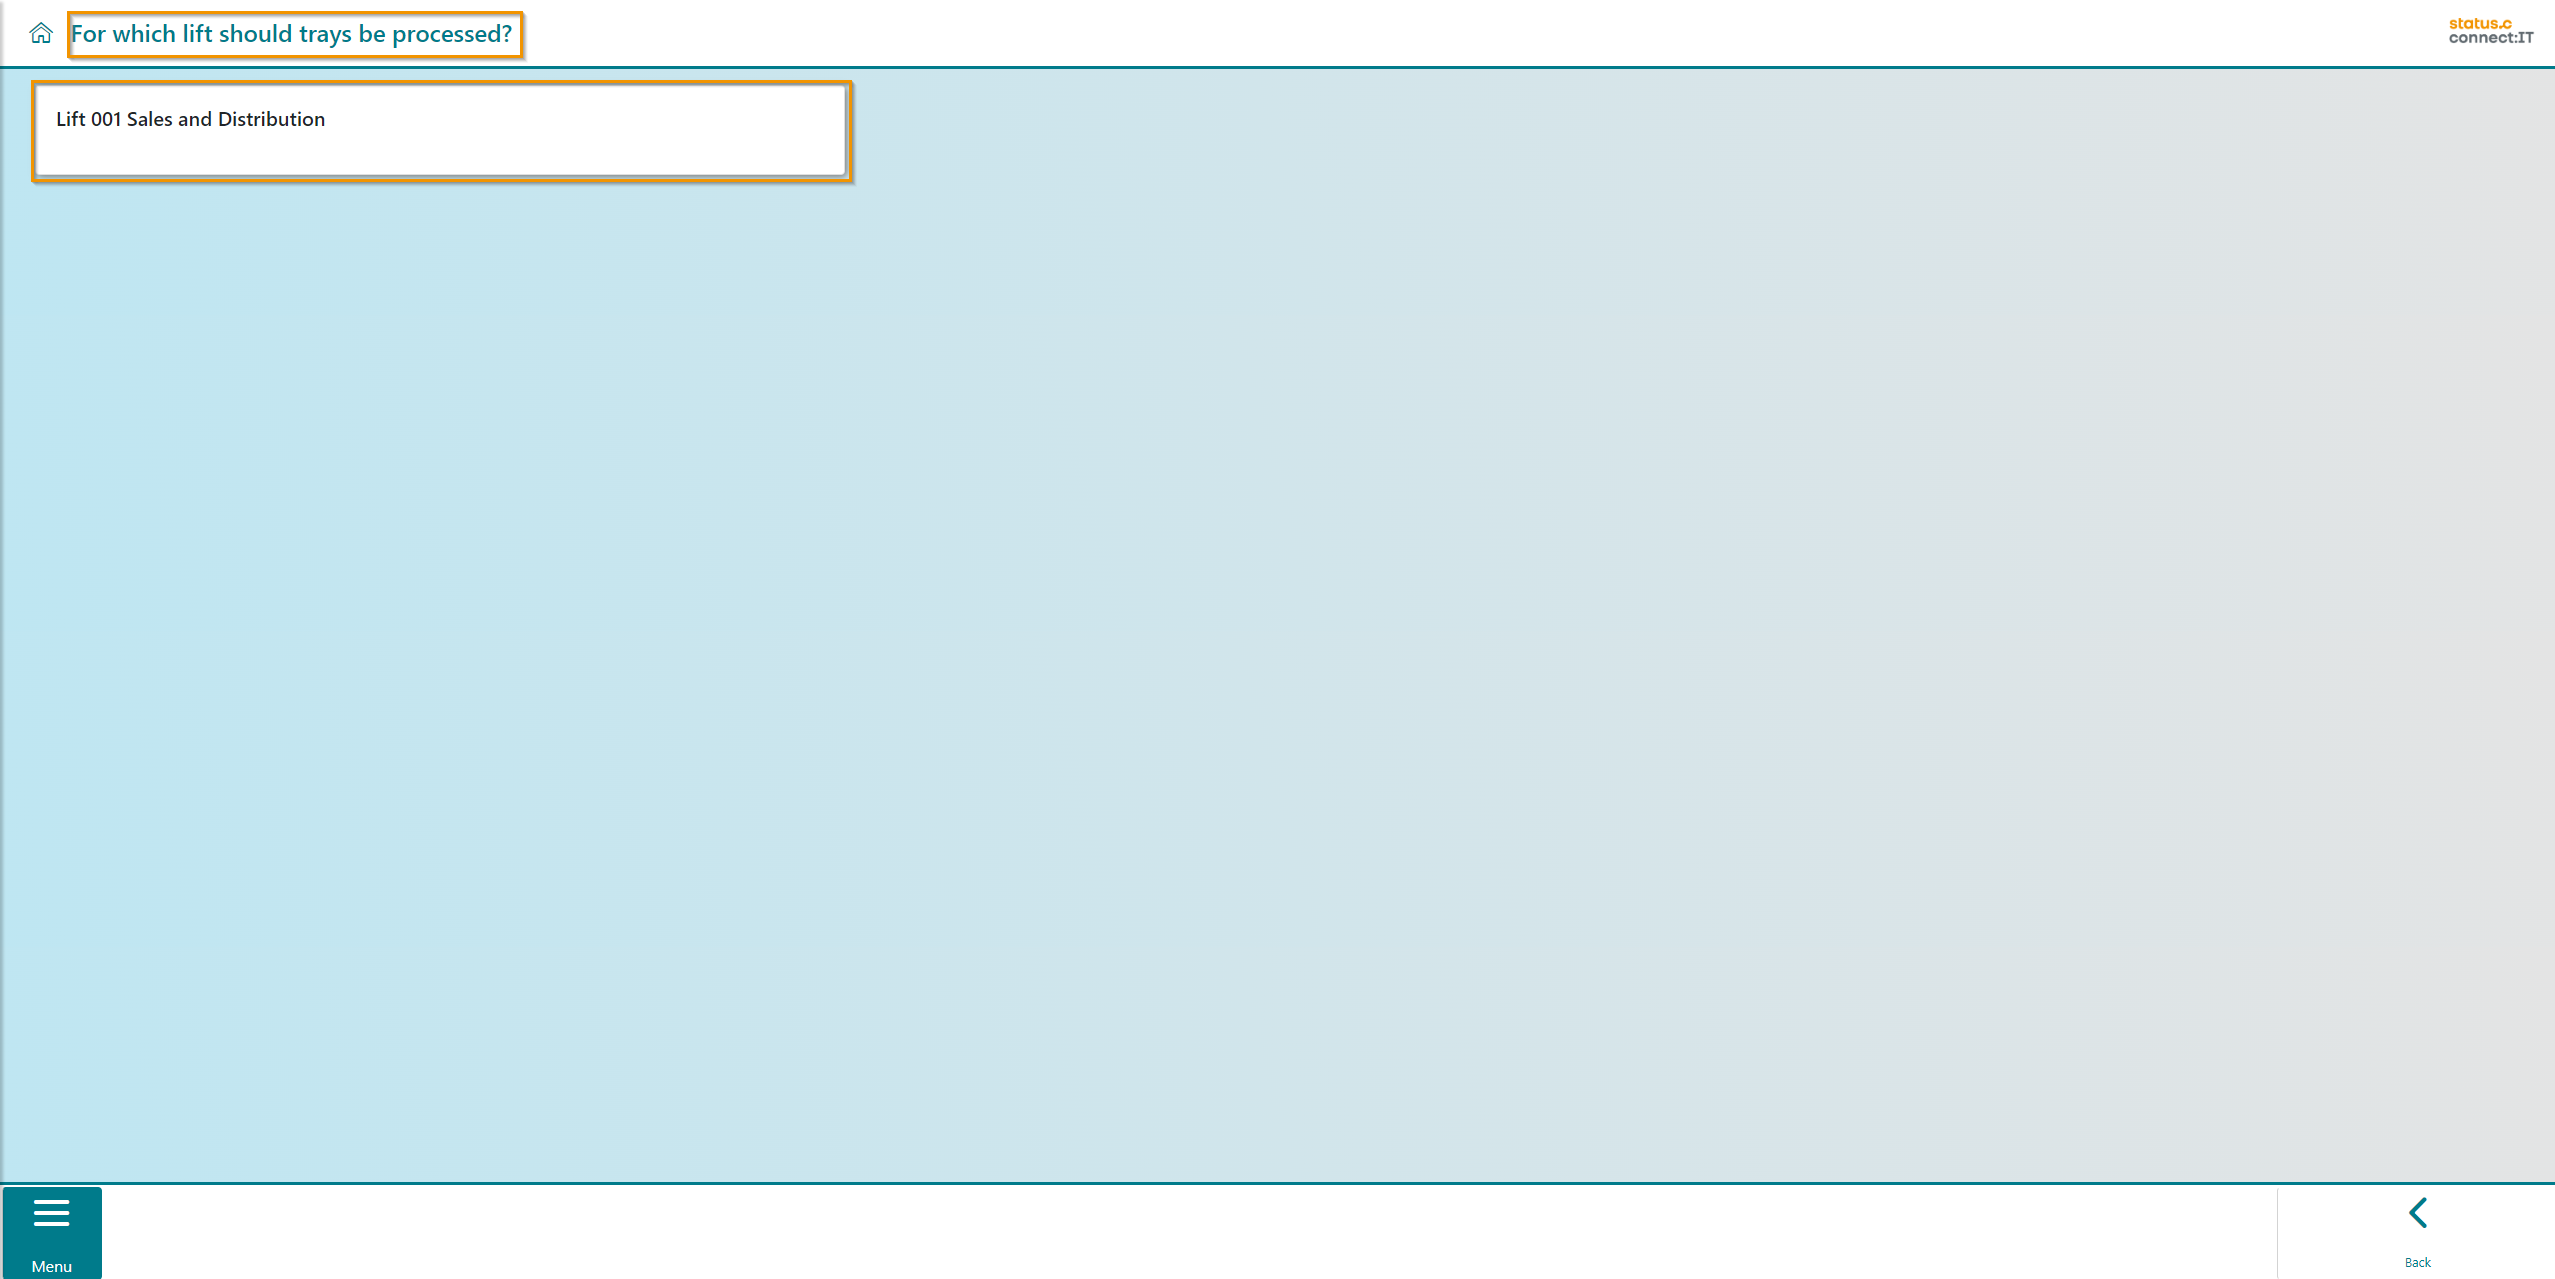
At the beginning, select a lift where the tray for processing is located. In this example, only one lift is available. The header serves as a reminder of the needed input.
|
Button |
Function |
|---|---|
|
|
Using "Back" takes you to the previous screen. |
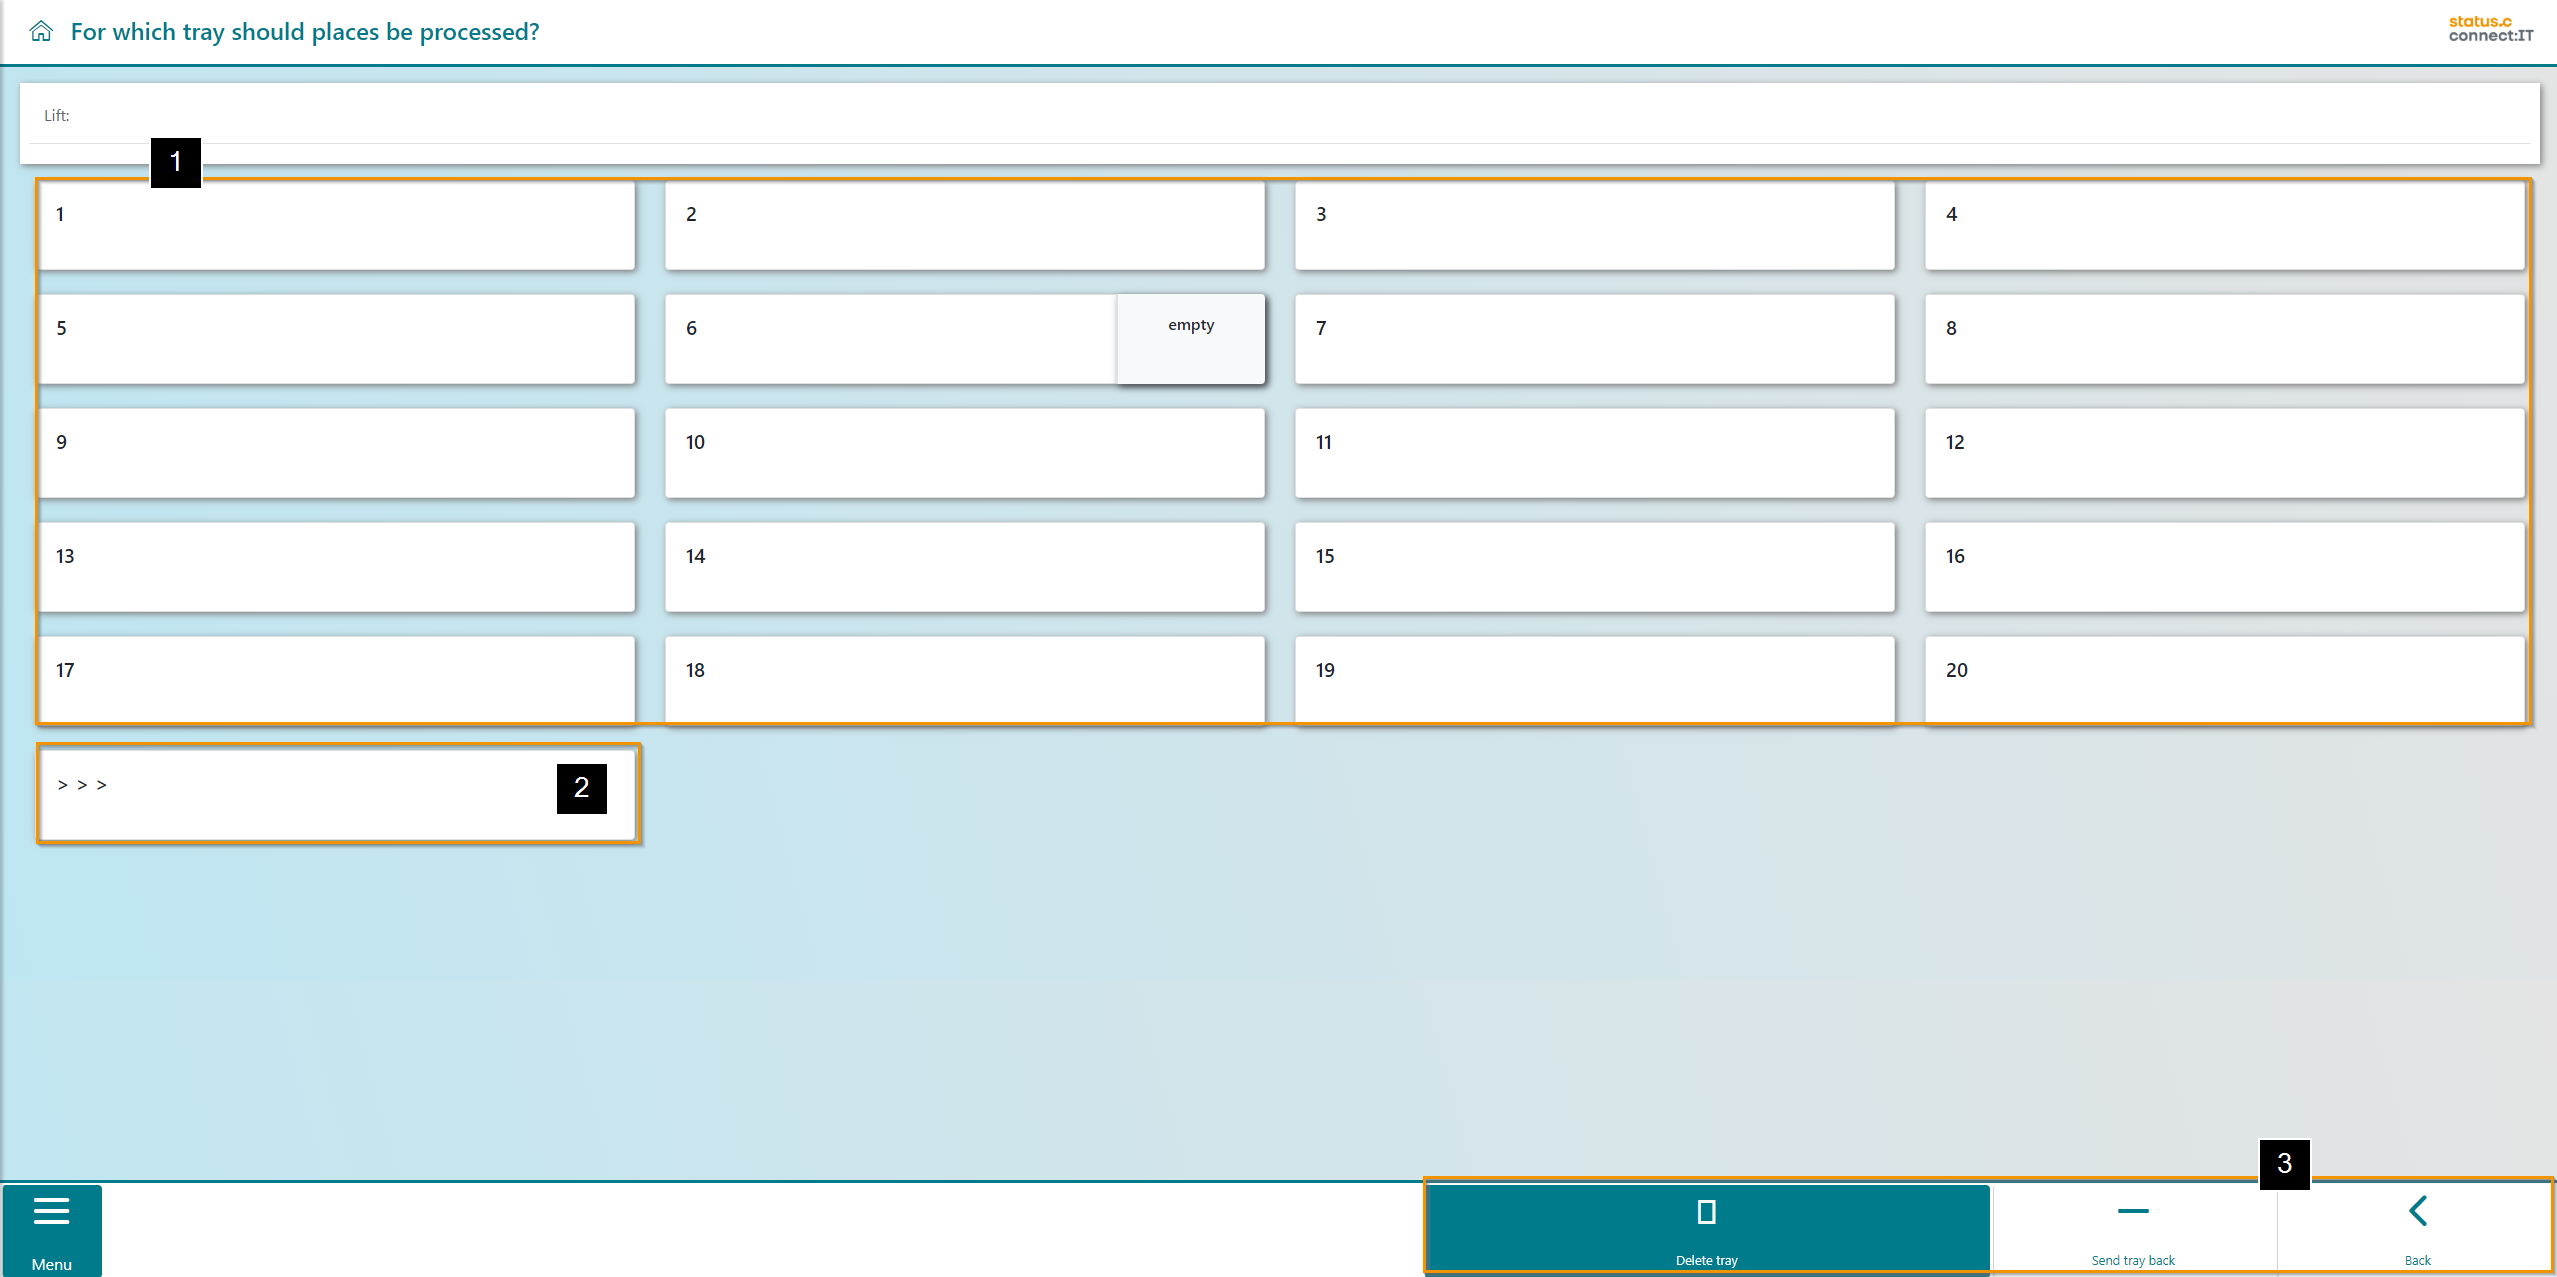
In this view, you can see which trays are available for modification (1). You can use the arrows (2) to jump to the next page of trays. It is also possible to send the tray back, delete a tray or return to the lift selection (3).
|
Button |
Function |
|---|---|
|
|
Through the "Delete tray" button, a specific tray can be selected for removal. |

|
The "Send tray back” button clears the tray from the opening back into the lift. |
|
|
Using "Back" takes you to the previous screen. |
Editing the tray
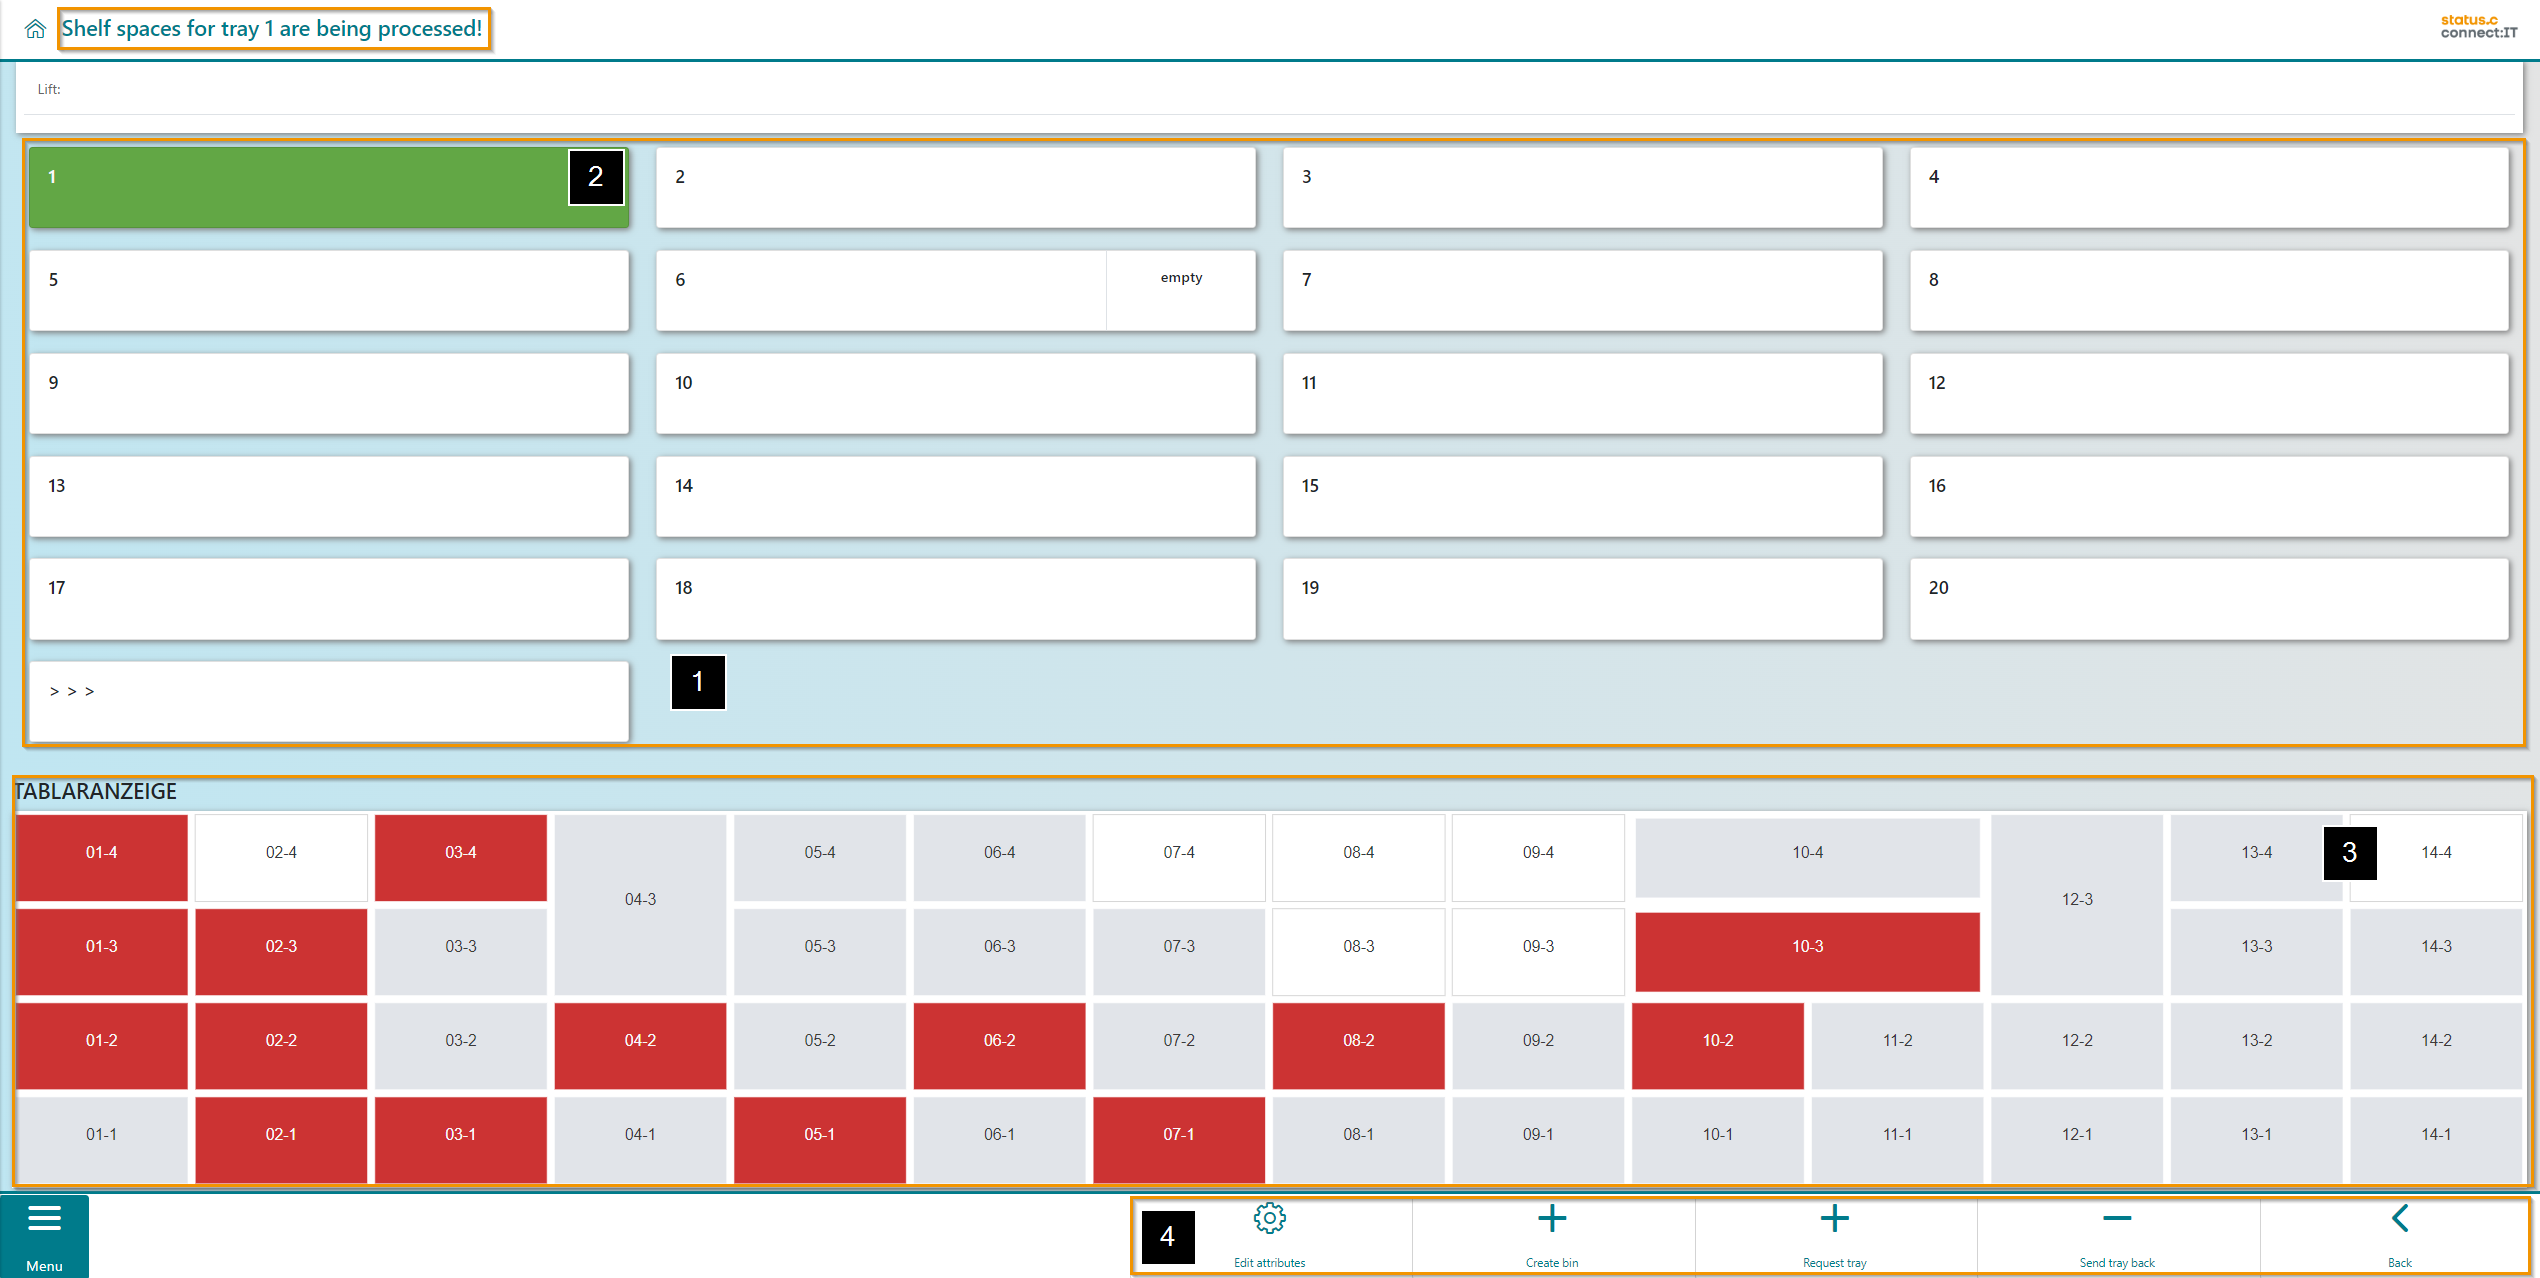
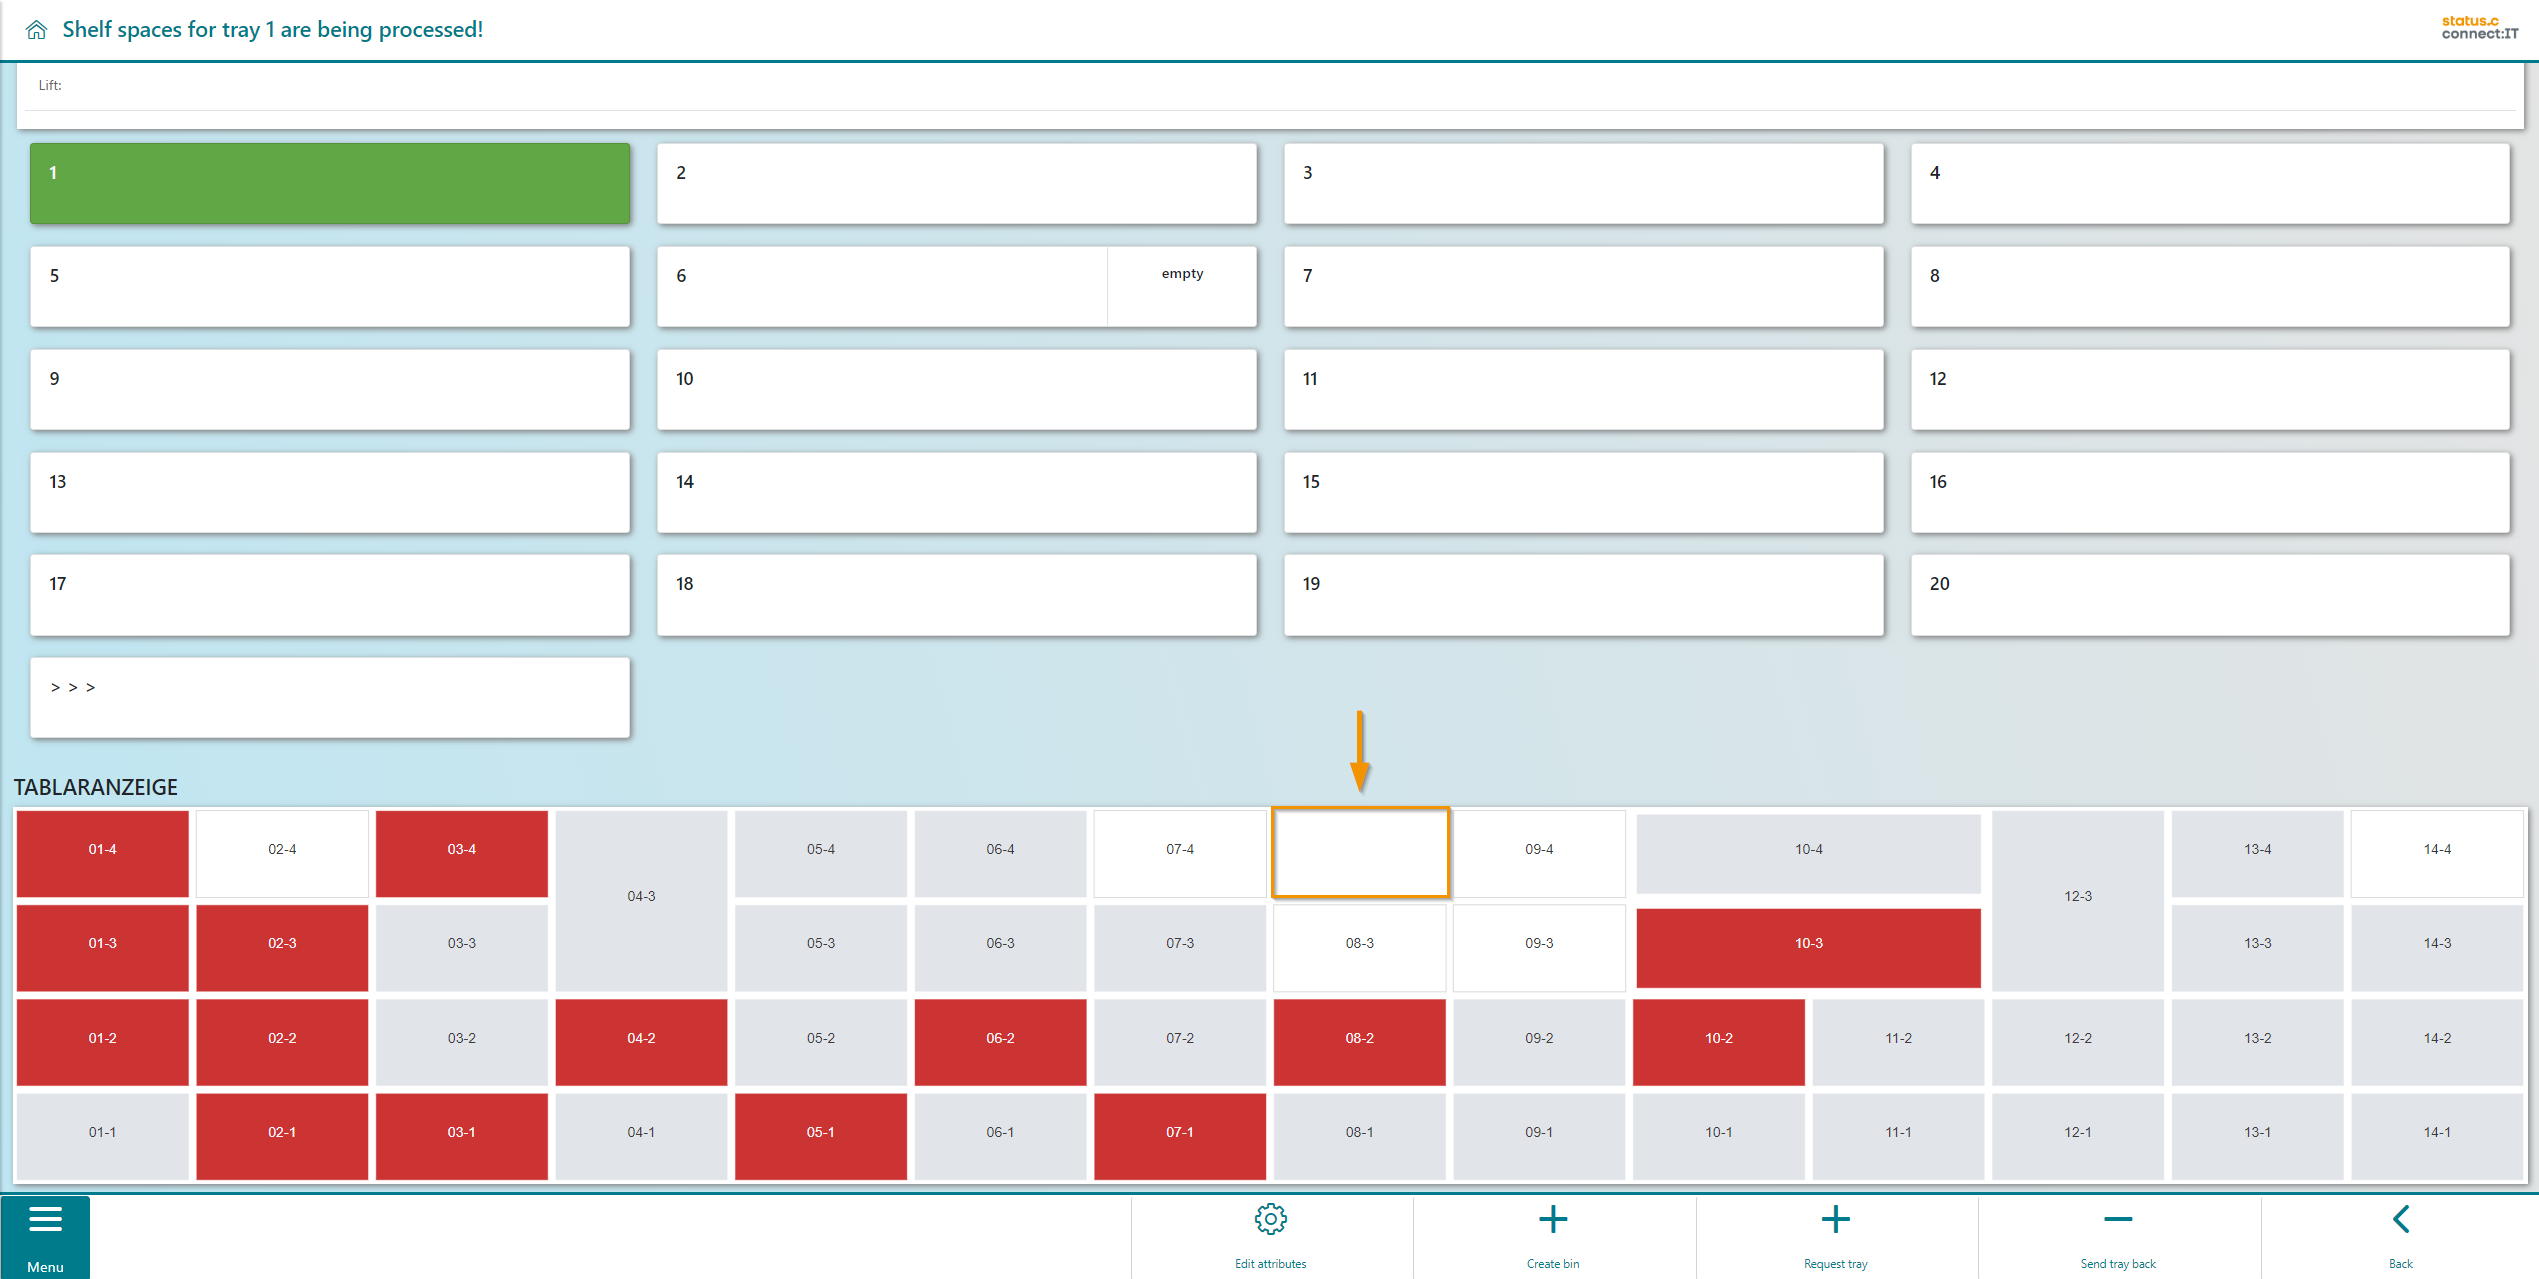
Select the tray to be edited. The individual trays are visualized in the middle (1). In the example, tray 1 is selected, this is highlighted by the green color (2). The selected tray is displayed in detail in the lower section of the screen (3). The bins are colored, red bins are blocked by the inventory, grey bins contain items and white bins are empty. The options for editing and controlling the tray are displayed in the navigation bar (4). In addition, a message is displayed in the header for which tray the spaces are currently being edited.
|
Button |
Function |
|---|---|
|
|
The "Edit attributes" button enables modifying the attributes of the chosen tray |
|
|
Click on "Create bin" to create a storage bin at the selected position. |

|
The button "Request tray" moves the tray from the lift to the removal opening. |
|
|
The "Send tray back” button clears the tray from the opening back into the lift. |
|
|
Using "Back" takes you to the previous screen. |
Deleting bins
Touch or click on the bins in the tray visualization to select them (1). If at least one tray is selected (highlighted in green), the button "delete bin(s)" appears (2). In the example, a bin is selected and deleted.
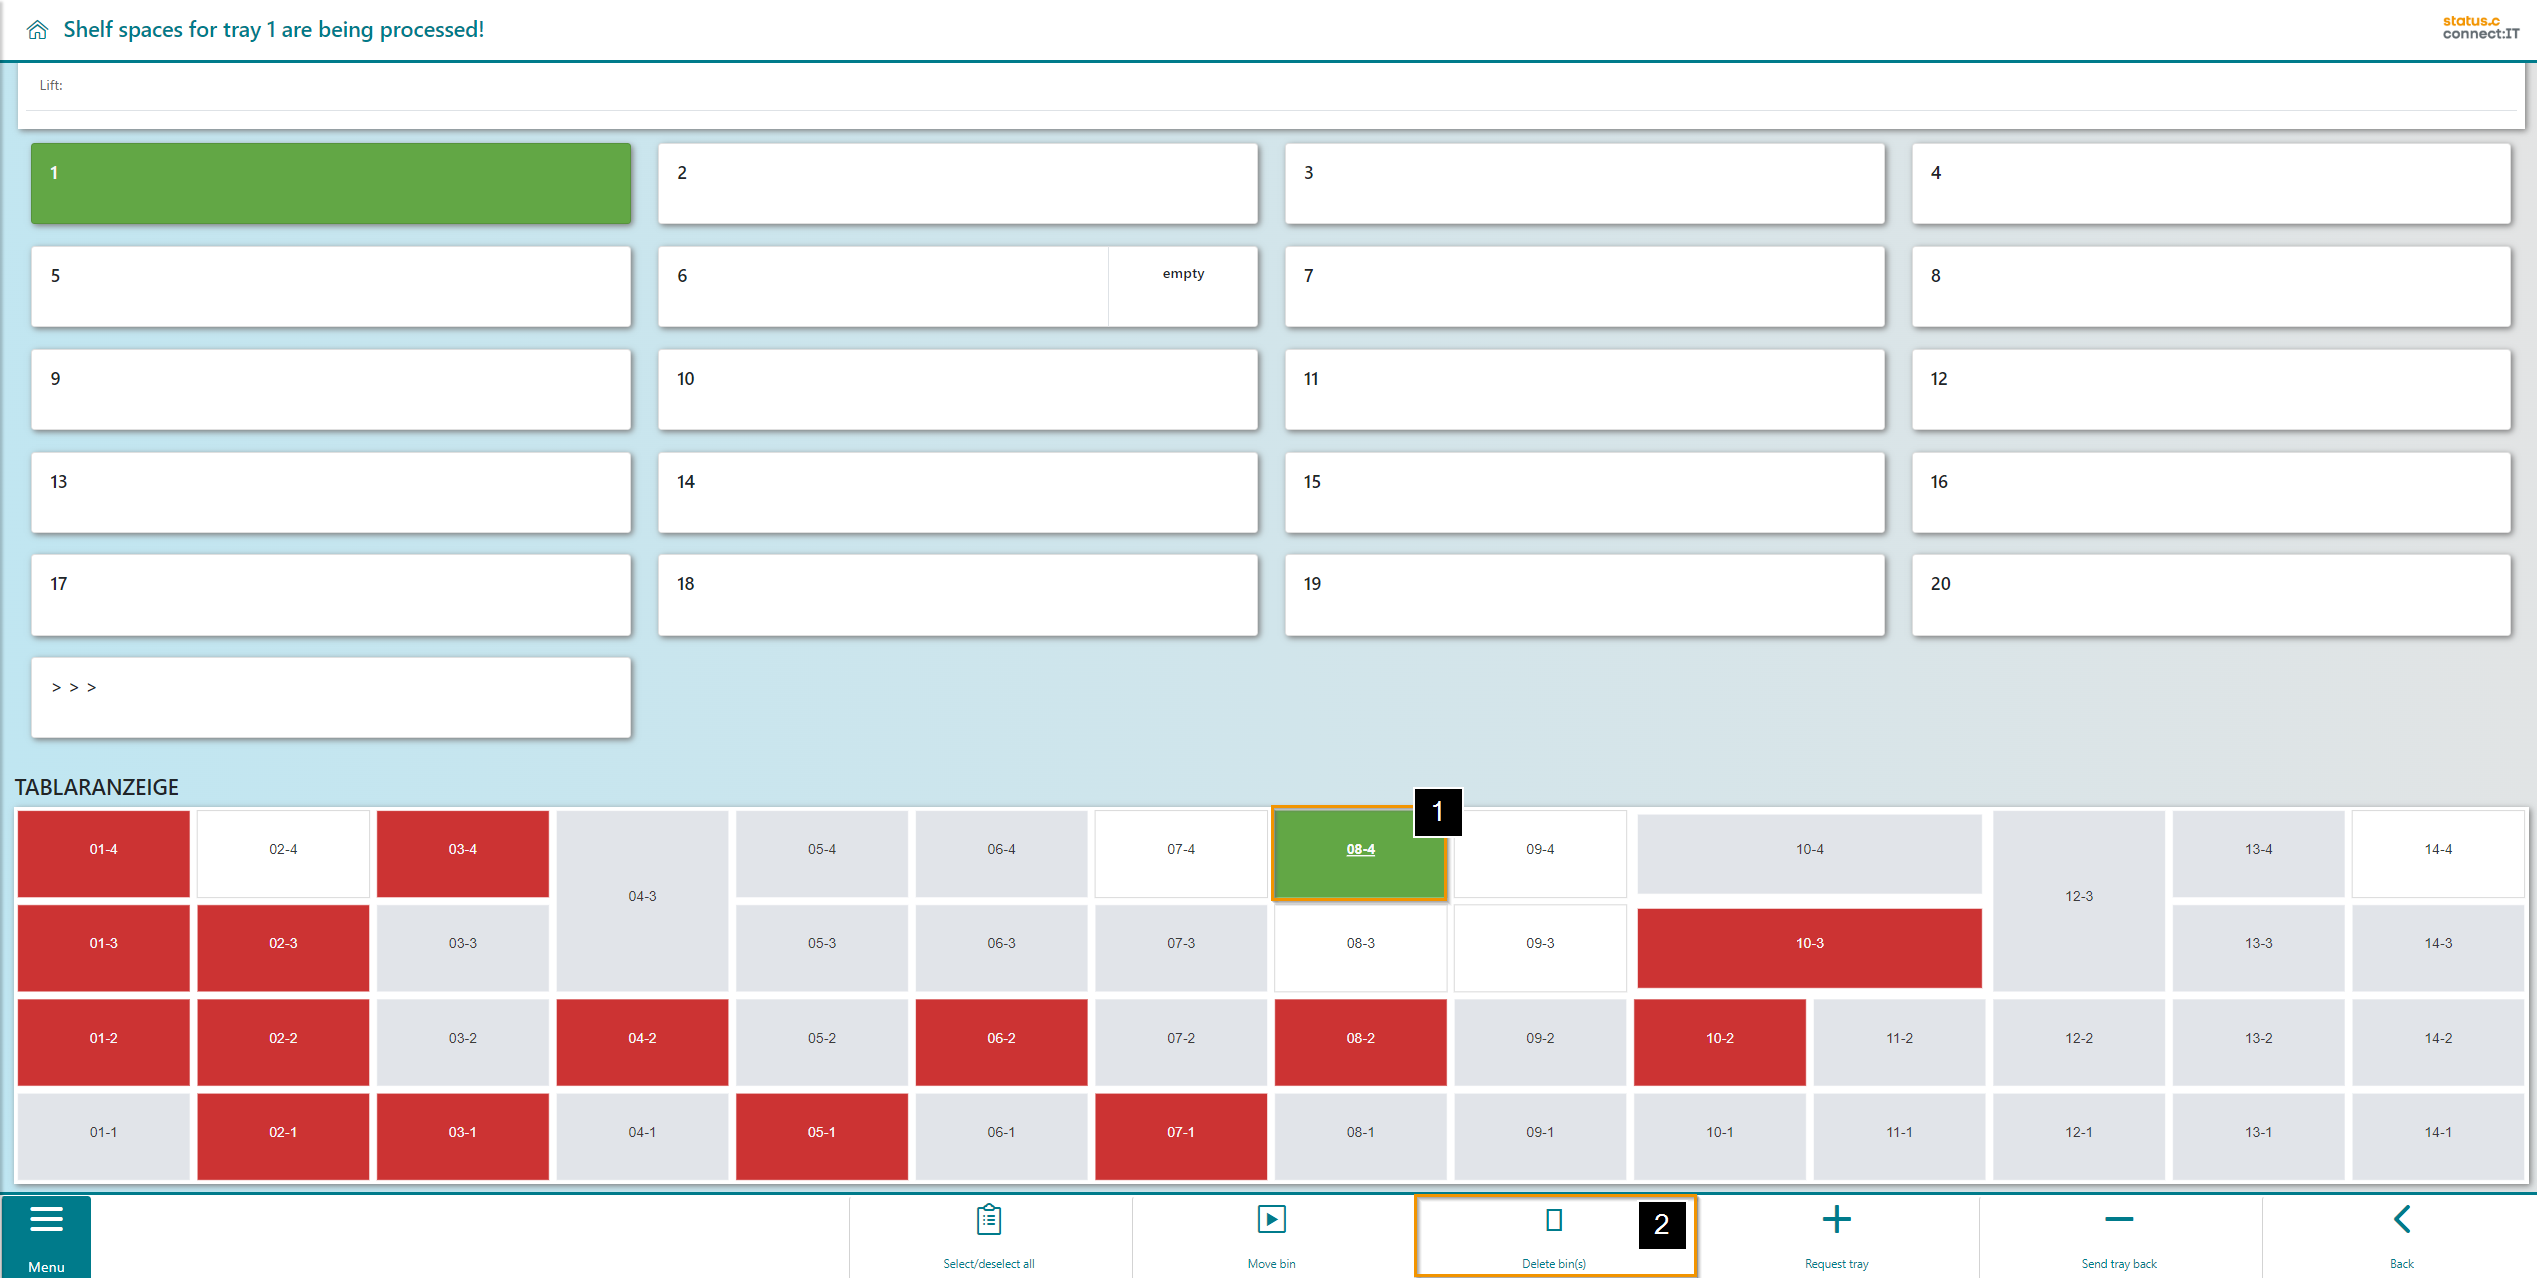
Deleting the bin in the tray visualization has the consequence, that the SAP-bin in the LAGP as well as the STC-bin in the tray-bin-table, where the coordinates and the dimensions of the bin are deposited, are removed. A bin can only be deleted if there is no material stored and no orders targeting that location. Otherwise, a message will appear.
The bins are now deleted.
|
Button |
Function |
|---|---|
|
|
Using "Select/deselect all" selects all entries in the worklist or clears the selection |
|
|
The "Move Bin" button enables the relocation of a bin using arrow buttons. |
|
|
Using "Delete bin(s)" the selected storage bins are deleted. |
|
|
The "Edit attributes" button enables modifying the attributes of the chosen tray |
|
|
Click on "Create bin" to create a storage bin at the selected position. |
|
|
The button "Request tray" moves the tray from the lift to the removal opening. |
|
|
The "Send tray back” button clears the tray from the opening back into the lift. |
|
|
Using "Back" takes you to the previous screen. |
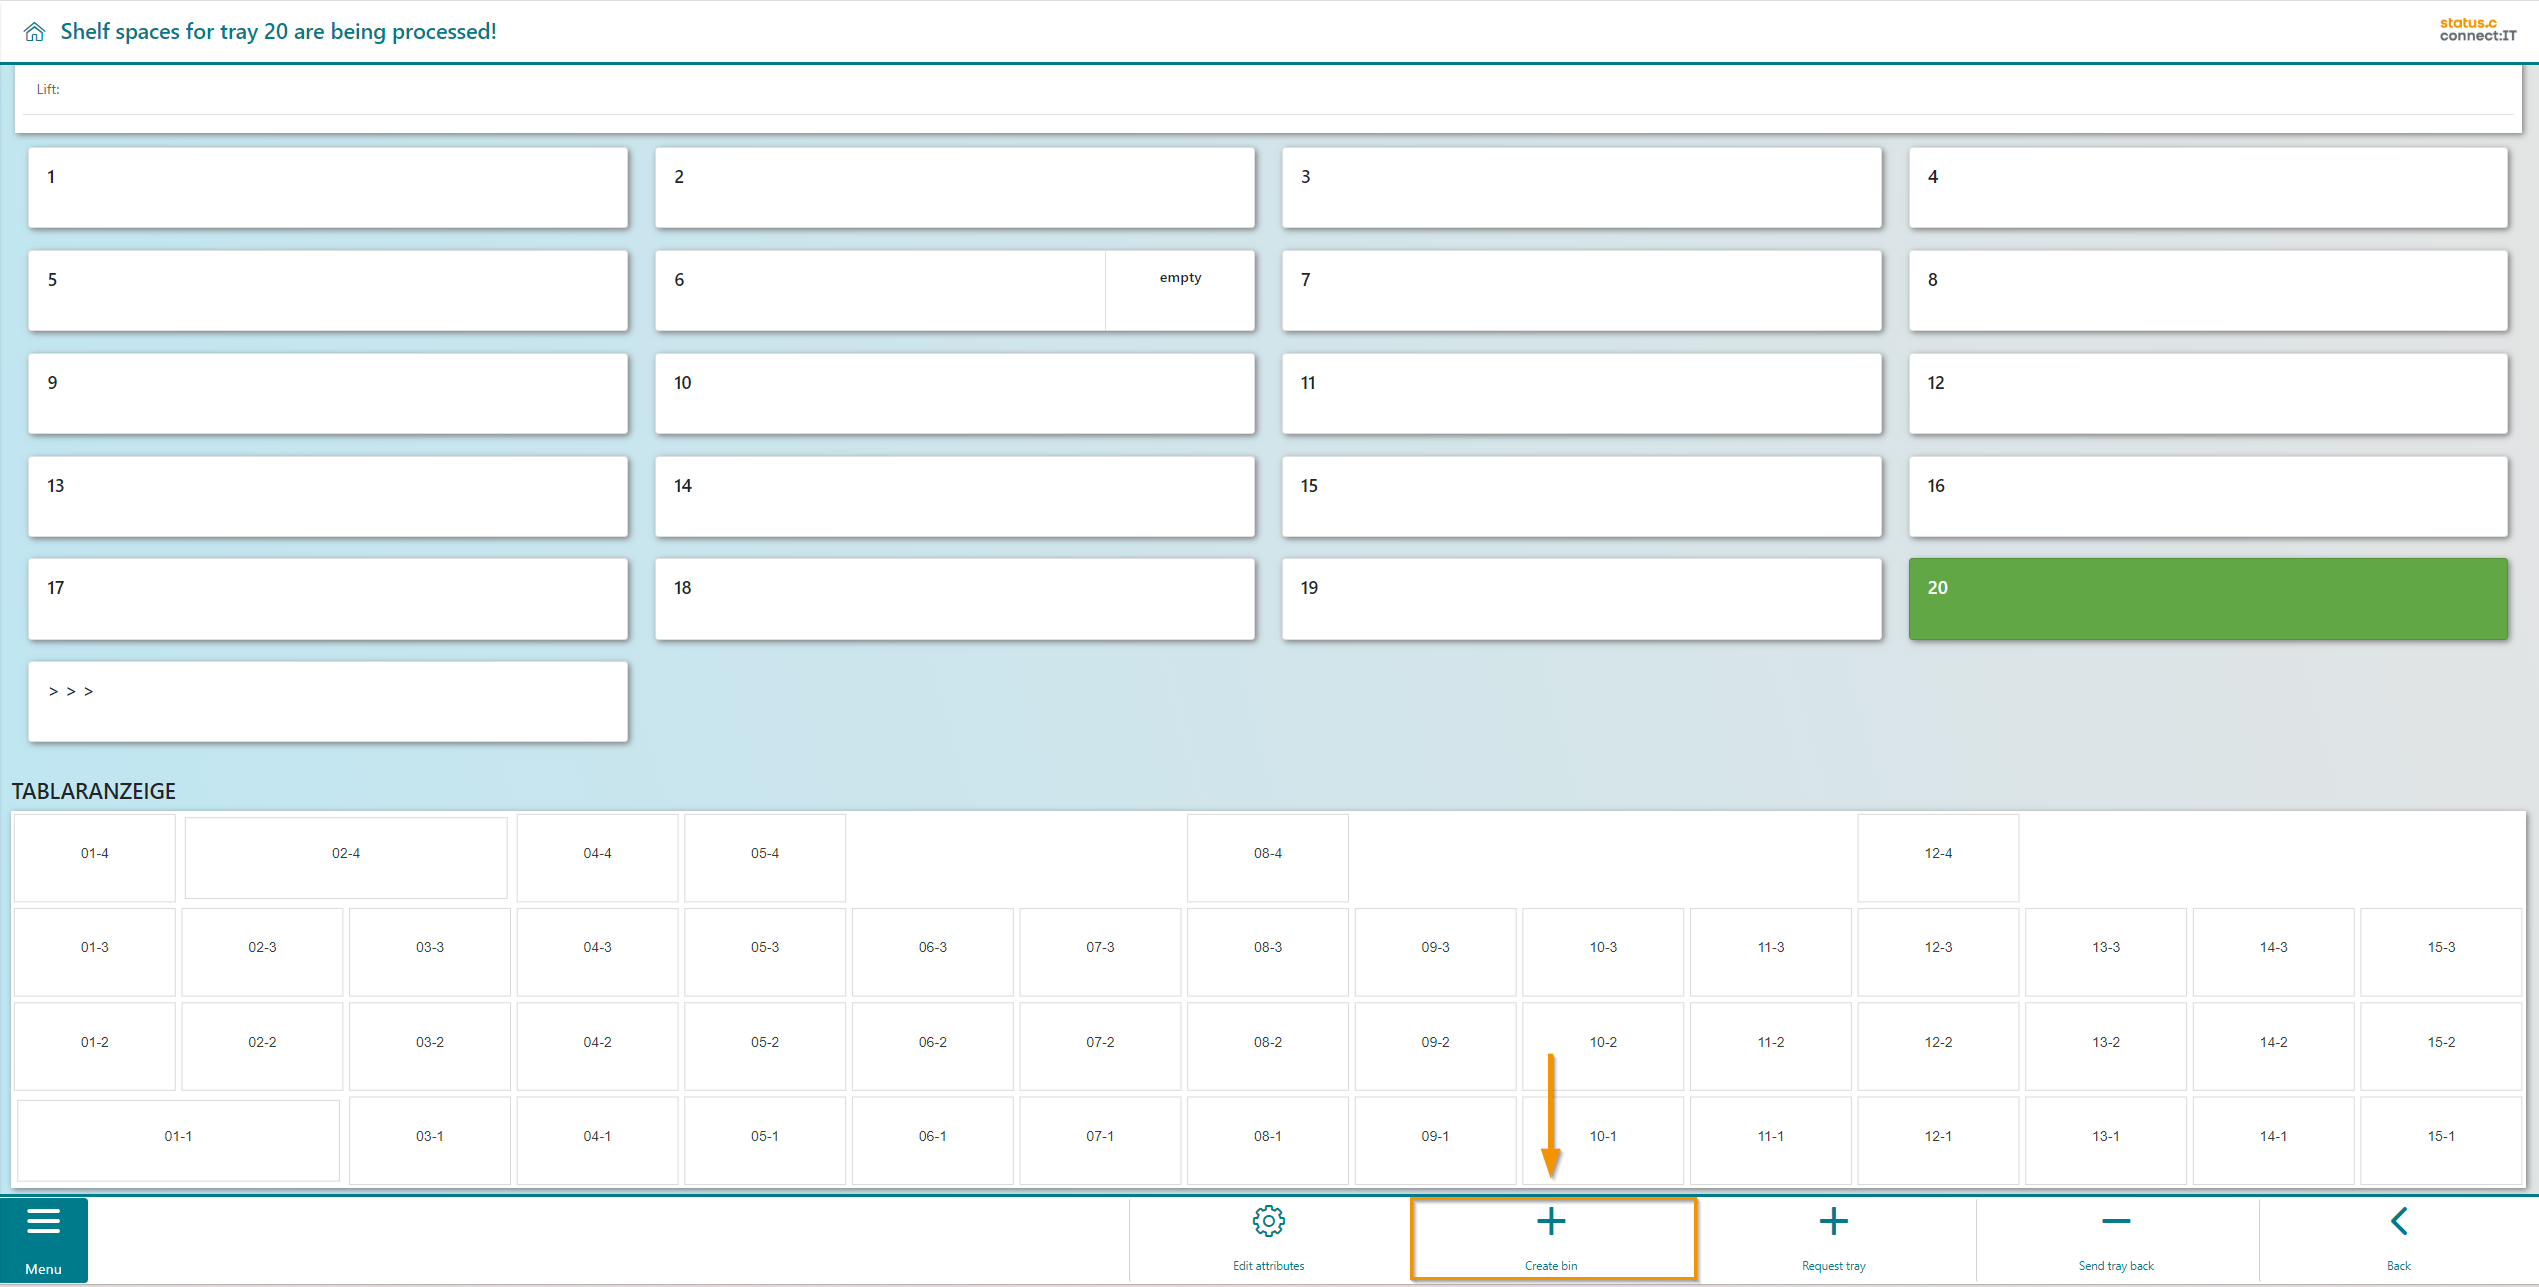
Create storage bins
If no bin is selected and at least one bin was deleted, the user can create one or multiple new bins in the empty area. Clicking on the "Create bin" button leads to the selection of the storage unit type for the new bin.
|
Button |
Function |
|---|---|
|
|
The "Edit attributes" button enables modifying the attributes of the chosen tray |
|
|
Click on "Create bin" to create a storage bin at the selected position. |
|
|
The button "Request tray" moves the tray from the lift to the removal opening. |
|
|
The "Send tray back” button clears the tray from the opening back into the lift. |
|
|
Using "Back" takes you to the previous screen. |
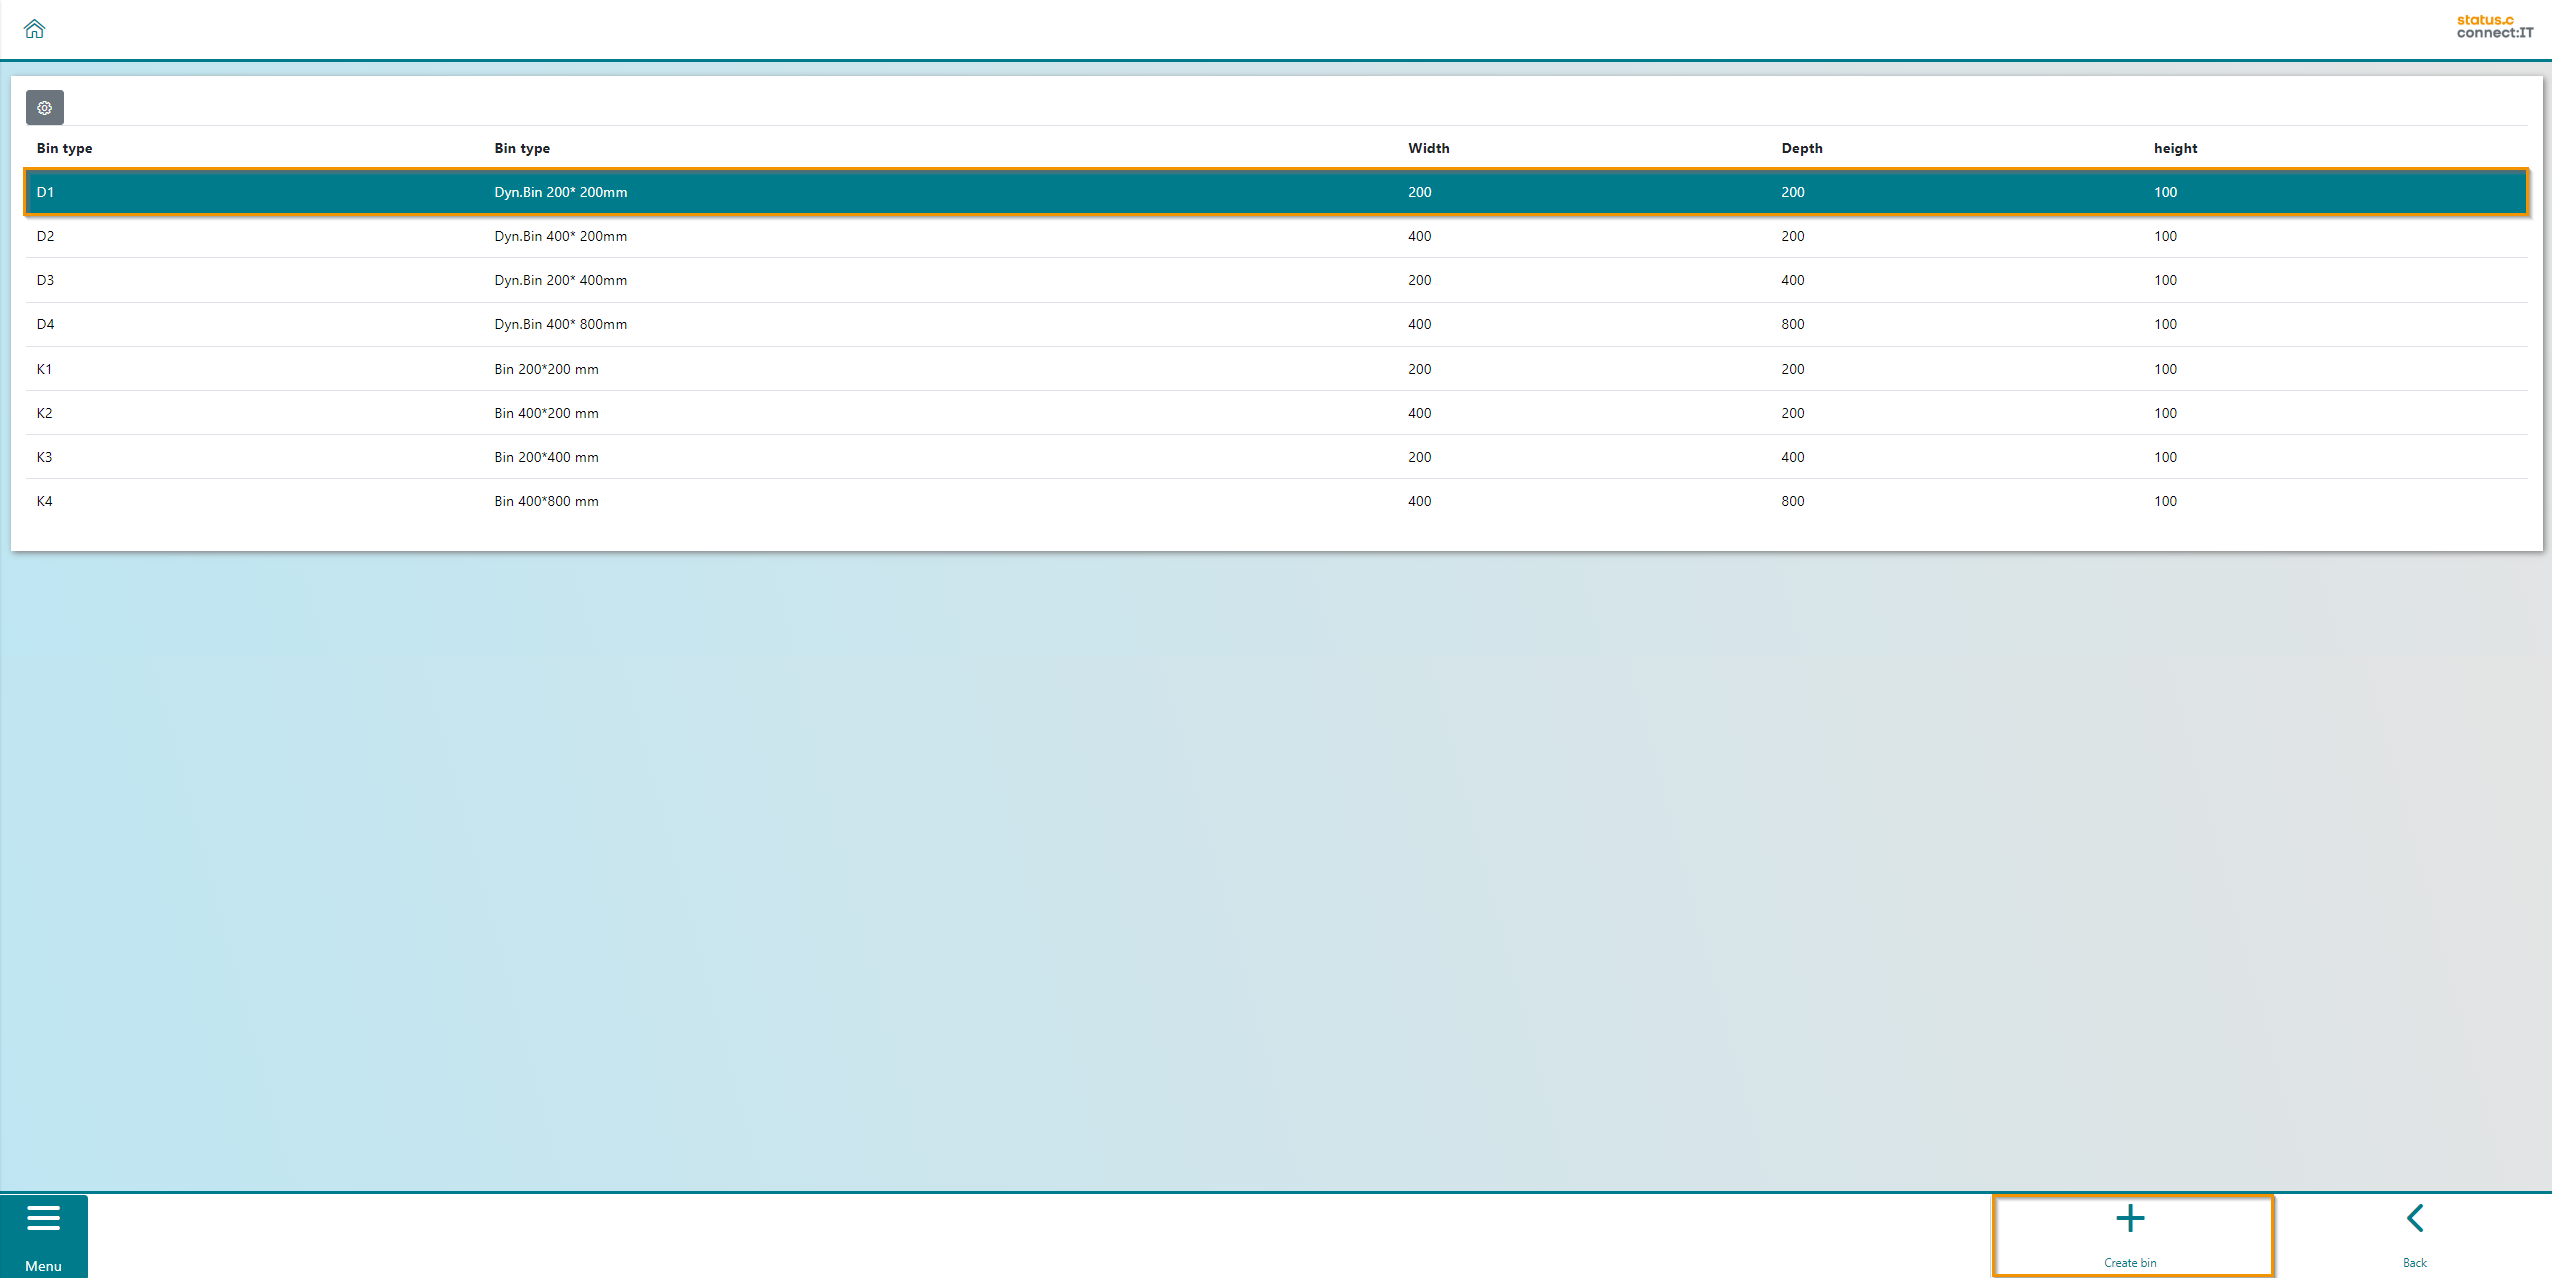
In the center, the storage unit types, which can be created, are displayed. The storage unit types have different dimensions. The selection of a type is done by selecting the respective line in the table (1). Once a type is selected, the bin can be created by using the "Create bin" button.(2) This process can be carried out several times, until the empty areas on the tray are filled with new bins.
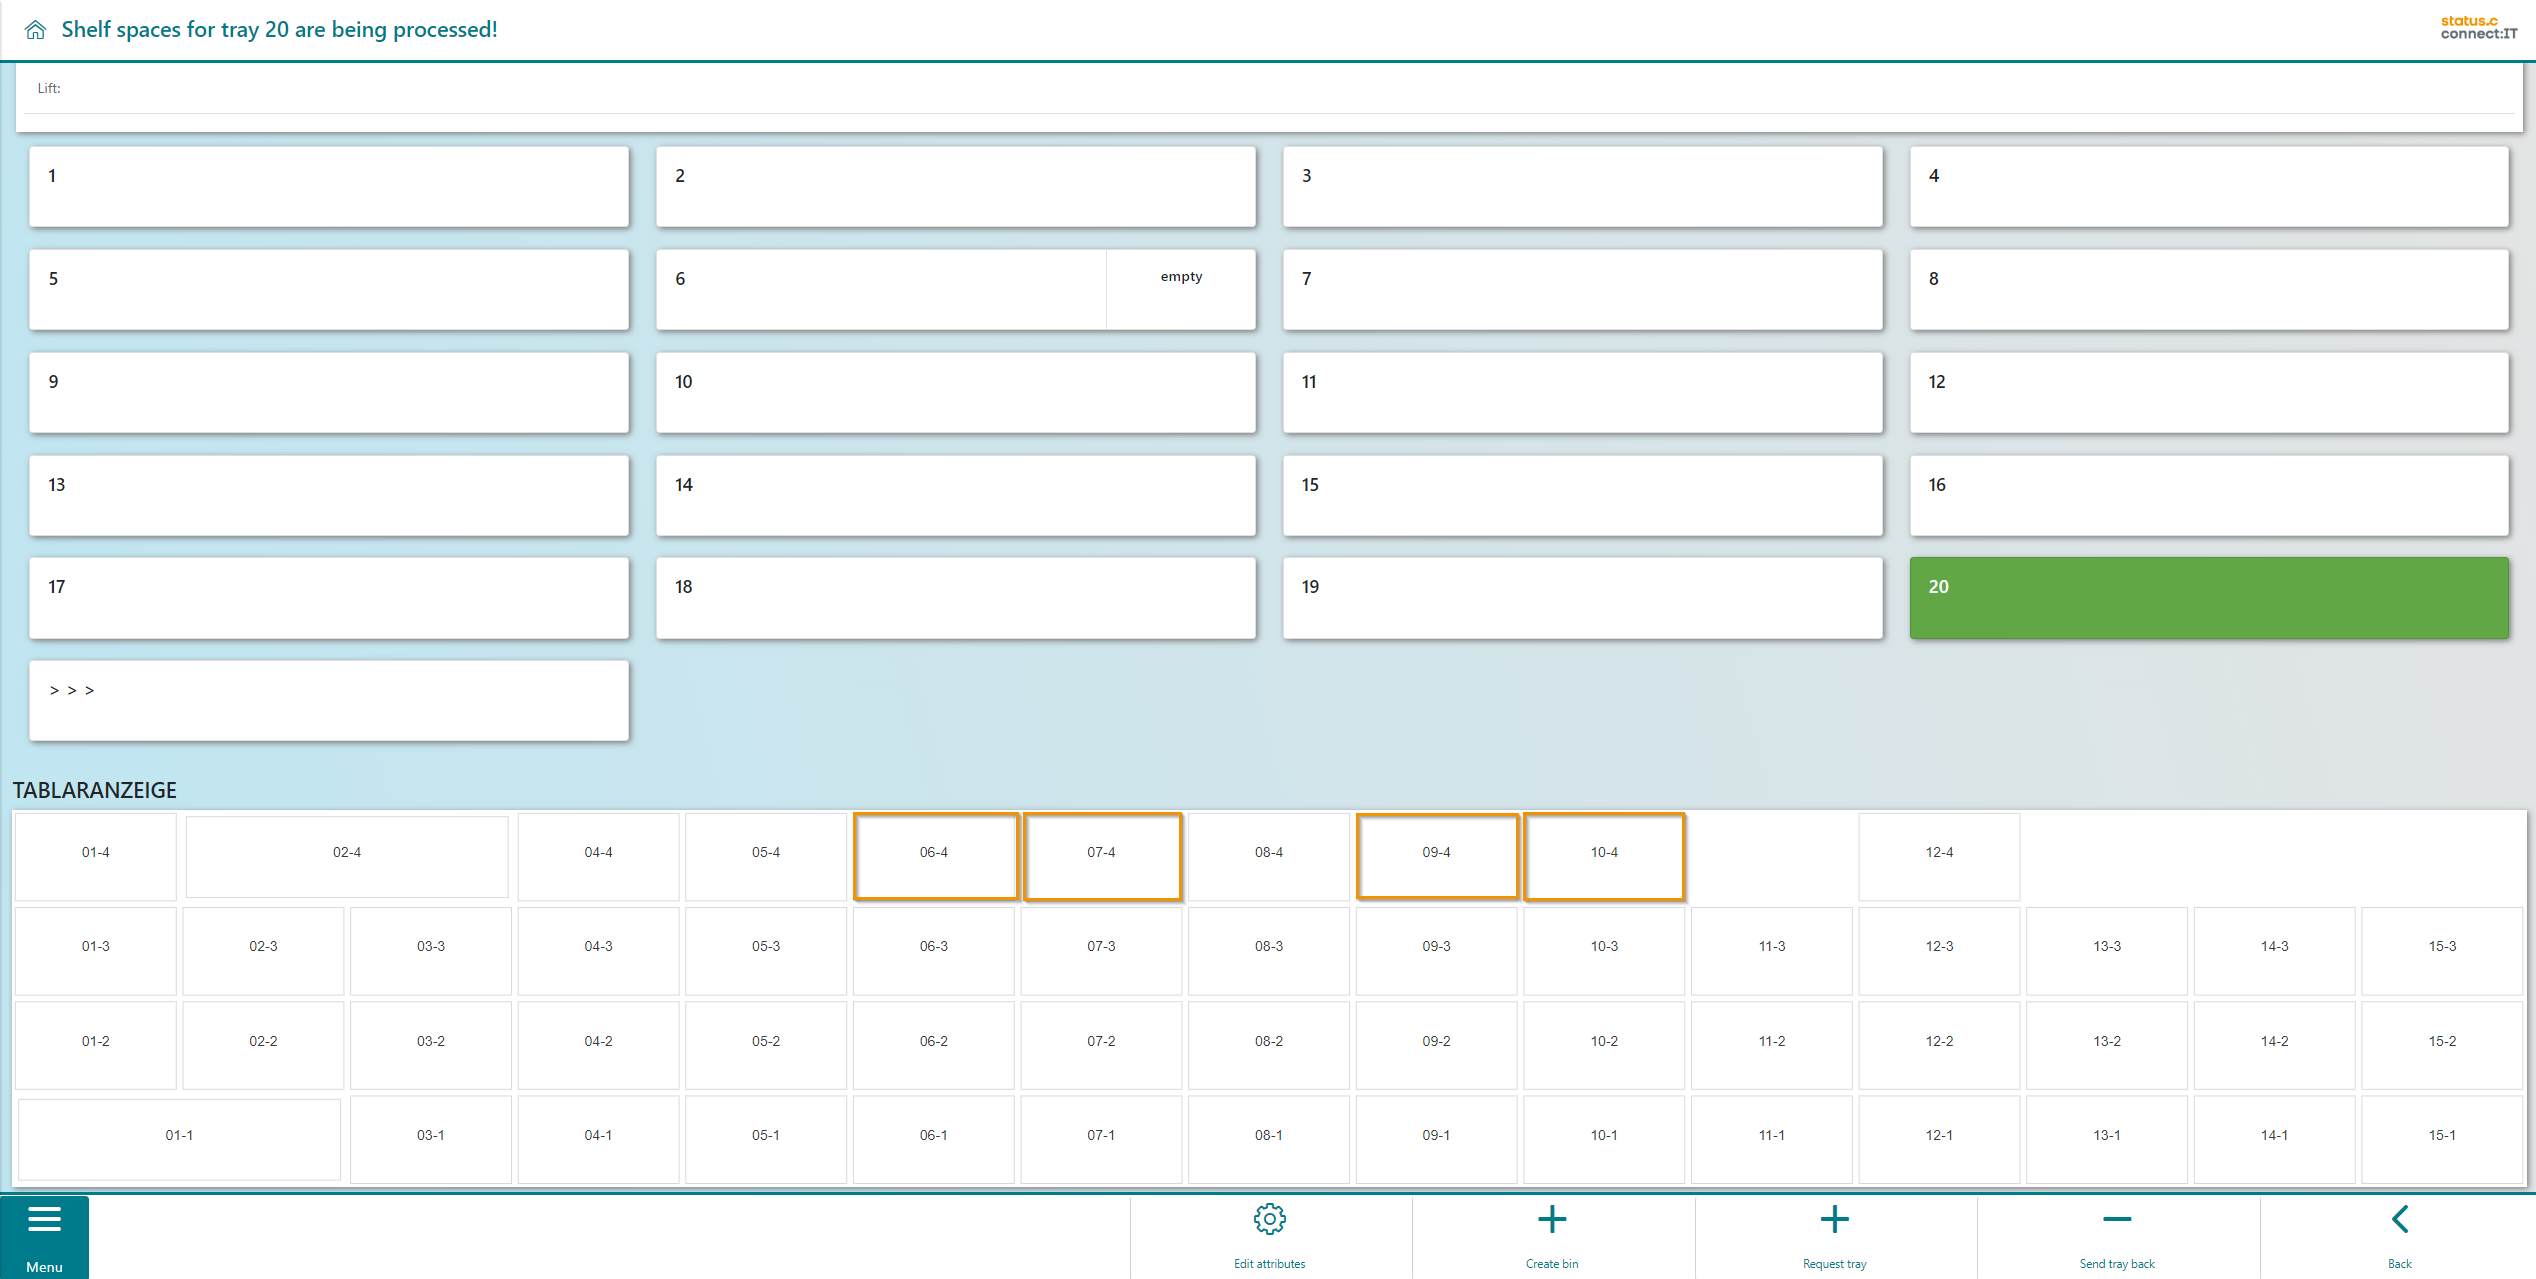
After selecting "Create bin" in the previous screen, the tray visualization opens. Every empty area that can be filled with the chosen storage unit type will be selected and marked in green. Clicking on a green-marked bin will deselect it and the color changes to a lime green. With the final input of the "Create bin" button, every selected bin will be created.

|
Button |
Function |
|---|---|
|
|
Click on "Create bin" to create a storage bin at the selected position. |
|
|
Using "Back" takes you to the previous screen. |
Error notification
If no free space can be found for the storage unit type, an error message appears (1) and the user has the option of choosing an alternative unit type or returning to the tray (2).

|
Button |
Function |
|---|---|
|
|
Click on "Create bin" to create a storage bin at the selected position. |
|
|
Using "Back" takes you to the previous screen. |